


Implementation of Greenhouse farming:
 Present situation in Grenada
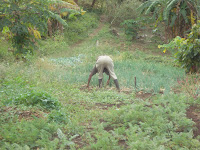
A major challenge at the national level will be to make agriculture viable and attractive for investment in support of the national economic development process.
The challenge has become onerous because the sector lacks the necessary infrastructure (irrigation, roads, storage and transport and marketing) especially for non-traditional crops. There is also a lack of modern technologies as well as necessary information to support planning and decision making. Other characteristic features of the sector are an aging population; low levels of investment capital and weak linkages between agriculture and other sectors; small and uneconomic farm sizes and low productivity. Frequent hostile weather conditions also contribute to the risks of production. In closing many produce are not package for conservation or recognition given to the farmer/s. (caricom)

Implementation of Greenhouse farming:
Farming in Grenada is being done the same way for many years since our ancestors came to the island as slaves back in the 1800s; they have worked the land tirelessly day and night under the blazing sun and at many time will lose their crops/ produce during the raining season due to erosion and moreover from larceny.
Greenhouse farming systems for seedlings and vegetables are not practiced by the ordinary farmer and as a result this is a venturing opportunity for our company to grow our produce systematically with the use of technology, meeting the consumers demand and also to utilize this as a water conservation strategy within the agricultural industry. Improving livelihoods. (Less time will be spent clearing the land however will be placed in research and market development programs)
HCGTec after studying the historical and future trends of production and demand for vegetables and seedlings for the past years; the owners see the opportunity to establish a vegetable and nursery greenhouse system to meet the future demands. This is expected to increase by 45 %.
Benefits from Greenhouse farming in Grenada:
Control of pests disease and weed control
Decrease harsh field working condition
Increased yields
Improved quality and consistency of crops
Increased control over crop nutrition
Impeccable quality
Competitive rates
Higher Business Values
Cutting edge technologies
Greenhouse will allow HCGTec to provide the following services;
· Lower cost Vegetables and seedlings. There will be no need for scarcity of goods, thus allowing consumers to consume local good constantly.
·Healthier and more cost effective farming. With HCGTec consumers get the high quality good giving greater flexibility and mobility to businesses; customers (eg. hotel, wedding,), management, and sales team and other household individuals.
·Maximizing small plots of land through Greenhouse systems
Greenhouse tips
Pointers for building a Greenhouse
EXTERNAL (Environmental Impact assessment)
Before the installation of any HCGTec will conduct and intensive environmental assessment of the site to ensure that the minimum requirements are met. Special consideration would be given to protect the structures that are located on hillsides so the topography does not shade the structure during sunrise or sunset.
Soil study: the soil should be well drained to avoid water logging and flooding. The use of compost, peat, or other organic materials will be used to help improve drainage and quality.
Topography: the productivity of the Greenhouse will be most effective if the structure is built on a slightly elevated structure in all directions. The construction site should be leveled and well-drained with maximum exposure to the sun and adequate availability of running water.
Water supply: water is essential for maximum production. An external irrigation system could be used to administer the required quantity of water. Rain or municipal water in will be stored cisterns that are easily cleaned.
The selection of the irrigation system will be chosen depending on the farmers desires and type of crop desired for growth, which includes an injector, drip tape, or overhead sprinkler.
INTERNAL (SERVICES):
tto ensure that all environmental conditions are met, instruments will be use for optimal crop production which includes:
Thermometer: temperature readings.
Hygrometer: measures the humidity (the level of moisture in the air)
Light Meters: measure the intensity of light.
Electrical conductivity meter: measures the total amount of all fertilizer mineral salts in a solution which includes total soluble salt levels in water, fertilizer solutions and leachates.
Magnifying lens: use for the observation and identification of pests and disease symptoms.
Bio-fertilizers: will be available for in 10 and 20 pound bags for sale.
It is essential that the Greenhouse be as tight as possible so that it retain both heat and humidity
The construction of high tunnel structures are strong but yet can be easily dismantled during the hurricane period, to avoid lost of material and plants. All lumber for construction MUST be treated with an environmentally safe preservative such as CCA.
The construction of high tunnel structures are strong but yet can be easily dismantled during the hurricane period, to avoid lost of material and plants. All lumber for construction MUST be treated with an environmentally safe preservative such as CCA.
Sweet peppers
Sweet pepper growing Requirements and Guidelines
Scientific classification
Kingdom:
Plantae
Order:
Solanales
Family:
Solanaceae
Genus:
Capsicum
Species:
C. annuum
Binomial name
Capsicum annuum L.
Sweet peppers are most easily grown from transplants. Start seed indoors 7 to 10 weeks before the date you intend to set peppers into the garden. Sweet peppers mature in 60 to 95 days.
Description. Peppers are tender perennials that are grown as annuals. Peppers grow on compact erect bushes 1½ to 2 feet tall. The fruit follows a single flower growing in the angle between the leaf and the stem. Sweet peppers vary in shape and color and include the slender banana pepper; the short, round cherry pepper; the small bright-red, heart-shaped pimiento; the multi-colored Italian frying pepper; and the blocky green to yellow to orange to red bell pepper.
Yield. Plant 2 to 3 sweet pepper plants per household member.
Site. Grow peppers in full sun in soil that is rich in organic matter, moisture retentive but well draining. Peppers prefer a soil pH of 5.5 to 6.8. Work aged garden compost into beds prior to planting. The optimal soil temperature for peppers is 18°C or warmer.
Planting time. Sweet peppers grow best in air temperatures 18° to 26° C. Peppers are most easily grown from transplants. Start seed indoors 7 to 10 weeks before the date you intend to set peppers into the garden. In temperatures greater than 32° C, peppers may drop their blossoms although set fruit will ripen. The ideal temperature for sweet peppers is a daytime temperature around 23°C and a nighttime temperature around 16°C.
Planting and spacing. Sow sweet pepper seeds ¼ to ½ inch deep, 18 to 24 inches apart. Space rows 24 to 36 inches apart. Sow three seeds to each spot and thin to the two most successful seedlings. Peppers can be transplanted into the greenhouse when they are 4 to 6 inches tall.
Water and feeding. Keep peppers evenly moist but not wet particularly when blossoms appear and fruit begin to form. Soil that goes too dry can result in flower drop. Add aged compost to planting beds before planting and again at midseason.
Care. Keep planting beds well weeded to avoid competition. Peppers are shallow-rooted, so cultivate around peppers with care. Mulch to keep soil temperature and moisture even.
Avoid high nitrogen level compost which will create large leafy plants with few or no fruits. High temperatures and wind can cause flowers to drop and plants not to set fruit.
Pests. Peppers can be attacked by aphids, cutworms, flea beetles, and hornworms. Discourage cutworms by placing a collar around each transplant at the time of planting; hand pick hornworms off of plants. Flea beetles and aphids can be partially controlled by hosing them off the plants and pinching out infested foliage.
Diseases. Peppers are susceptible to rot, blossom end rot, anthracnose, tobacco mosaic virus, bacterial spot, and mildew. Plant disease-resistant varieties. Keep the garden clean and free of weeds where pests and diseases can shelter. Remove infected plants before disease can spread. If you smoke, wash your hands before working with the plants to avoid spreading tobacco mosaic virus.
Harvest. Sweet peppers are ready for harvest in 60 to 95 days after sowing. Sweet peppers mature from green to red as the seeds inside mature. For sweet red peppers leave green peppers on the vine until they ripen and turn red. The color change does not alter the taste. Cut the peppers off the vine. Pulling a pepper away from the plant may cause the plant to come out of the soil.
Storing and preserving. Sweet peppers will keep in the refrigerator for 2 to 3 weeks or for two or three weeks in a cool, moist place. Blanched peppers can be stored in the freezer for 4 to 6 months. Sweet peppers can be dried, pickled whole or in pieces.
Tomato
Tomato growing Requirements
History of tomatoes
Tomatoes grow wild in the Peruvian Andes and were first domesticated in Mexico and Central America. It’s hard to believe that Europeans initially regarded them as poisonous and grew them as ornamental plants. However, by the end of the 18th century they were widely used in cooking and salads. Although classed as a fruit, they are the second most popular vegetable and give a higher yield for the amount of space than any other.
FOURTEEN KEY STEPS for successful tomatoes
1. Choose varieties carefully
Tomato varieties are classified as determinate or indeterminate. Determinate varieties are bush types, producing one crop rather than a prolonged harvest. Indeterminate, or cordon types, grow on long vines and need staking. If their laterals or side shoots are removed these varieties crop over a long period.
2. Plant your seed
To get a head start sow seeds indoors five to seven weeks before you intend to set out plants – they take around three months to produce well. Tomato seeds germinate best in temperatures of 21° to 24°C during the day and around 16°C at night. Sow as deep as the seed is wide. Keep the soil moist until seeds have germinated.
Seedlings should germinate in eight to 10 days and for the next fortnight should be watered from the bottom to inhibit growth of fungal organisms.
3. Choose growing site carefully
Tomatoes are sweetest grown in full sun, but most varieties will produce a good tasty crop even in cool areas. Their main requirements are:
* Open, sunny well drained location. Many tomato diseases are associated with poor drainage e.g. stunting, bacterial wilt and fruit rots.
* Light, free draining soil pH 5.5 to 6.8, high in organic matter. Add peat moss or sand to improve texture of clay soils. Use compost to condition sandy soil.
* Good air circulation to prevent leaf blighting fungal diseases and fruit decay.
* Protection from strong winds
* Temperature for fruit to set is 18°C to 24°C.
4. Prepare your garden bed
Organic beds for tomatoes need lots of compost, natural rock minerals, and excellent drainage. Suitable materials include fallen leaves, household compost, composted cow or horse manure, rock dusts and vermicast. Worms also help aerate the soil. Ideally beds should be raised to promote good drainage and ensure healthy roots. A balanced soil and a healthy population of micro-organisms from organic composted material ensures strong plants with an increased resistance to pests and diseases.
5. Transplant seedlings
Seedlings can be transplanted five to seven weeks after sowing. Reduce transplant shock by minimising disturbance to the roots and soil surrounding them. Add a handful of compost or worm castings to each hole, or water in with chamomile tea. A tablespoon of milk powder also helps ward off fungal diseases.
Set out plants 60 cm apart in rows spaced 60 to 100 cm apart. Plant deeply. Tomatoes sprout roots from the stem, which make the plant more stable.
6. Support plants
Tomato plants have many side stems that break easily if not supported. Most varieties are best trained to one or two leaders to give larger tomatoes and keep them off the ground. Staking also reduces the likelihood of anthracnose and soil rots. Each leader requires its own stake. Tie the plant to the stake with soft yarn or small strips of old cotton. To prevent injury to the rapidly growing stem, attach the tie tightly round the stake and loop it loosely around the plant stem just beneath a leaf node. Plants with several leaders should be supported and trained on a fence or fame – or use a wire cage. Ensure the spaces in the wire are large enough for you to reach through to harvest.
7. Remove laterals
Other than those chosen for leaders, pinch out all remaining laterals (side shoots). To avoid large wounds and minimize disease attack, do this when laterals are small.
8. Mulch
Bare soil under tomatoes should never be exposed. Mulch provides a physical barrier between soil and plant surfaces, protecting from diseases, retaining soil moisture, preventing weeds from sprouting, and keeping roots cool. Suitable mulches include straw, leaves, dried grass clippings or pine needles. A living mulch of marjoram and oregano smells nice, confuses the white cabbage butterfly, and repels insects. Diverse living mulches of lettuce, basil and chives also repel insects and keep down weeds.
9. Use companion plants
Certain herbs and flowers planted near tomato plants improve their growth, repel insect pests and attract beneficial insects. Sprays can also be made from their leaves and flowers to tackle pests and diseases.
Basil is the classic tomato companion. Loved by bees, it repels aphids and whitefly. Tomatoes grown near basil take on their flavour. Basil sprays are useful to repel and sometimes kill whitefly, aphids and spider mites.
Other good companions include:
* Stinging nettles – proven to substantially increase crop yields and reduce fungal attack.
* Nasturtiums – repel aphids, green shield beetle. Also thought to deter/reduce fungal diseases
* Borage, phacelia and lemon balm – attract beneficial insects.
* All the umbilliferae family – celery, parsley and carrots – attract hoverflies to prey on tomato pests. They also feed at a different root zone so are good companions.
* French marigolds deter nematodes.
Other companion plants include thyme, asparagus, celery, foxgloves, lavender, garlic and sweetcorn. Do not plant rosemary, potatoes, kohlrabi, fennel, strawberries and dill near tomato plants. Members of the brassica family often harbour caterpillar larvae.
10. Feed plants
Foliar feeding is best, supplemented by the occasional root feed. The general rule is feed plants once a fortnight prior to fruit set. When fruit is setting, feed once a week, preferably late in the day, as plants feed at night. Suitable foliar sprays include compost tea, fish, molasses, worm rum and seaweed. These strengthen the stem and help plants resist pests and some fungal diseases.
Comfrey, animal and bird manures are suitable liquid fertilisers. Sprinkle a tablespoon of milk powder once a week around the plants and water in to help reduce fungal disease.
As long as plants have good colour, pH is fine. If a plant looks a little off colour give it a good feed of liquid fertiliser.
11. Water often and sparingly
A light watering every day is preferable. Watering should be even and regular so as to avoid problems such as blossom end rot, sclerotorium and stem rots.
Watering or rain when the fruit is maturing may cause the skin to split near the stem.
Water early in the morning, never in the heat of the day.
Do not water in the evening when plants are more prone to fungal attack.
Hand, rather than overhead watering, reduces the risk of fungal attack.
Water around the roots. Hand watering also helps avoid spreading disease.
12. Pluck the first flowers
Growing deep, extensive roots and a full leaf canopy helps establish newly transplanted tomatoes. Pull off the first flowers (that’s hard, I know) so the plant doesn’t devote energy to forming fruit before roots and foliage have filled out. Do this until plants are at least 30 cm tall. Also remove all shoots from the main stem below the first fruiting branch.
13. Inspect plants daily
Are any parts being eaten? Any change in leaf colour? Do any parts of plants look like they’re dying? Are plants wilting even though watered? Correct symptoms promptly. It doesn’t take long for a problem to get out of hand. Remember, cultural inadequacies, too much water, too little water, and erratic watering can produce symptoms that mimic disease. Promptly remove any dead, diseased and rotting fruit and leaves. Just one leaf attracts pests and more disease. Do not put diseased materials in the compost.
Insects and pests always attack the weaker plants first: consider having a sacrificial plant in the hope pests will leave the other plants alone.
14. Know your pests, diseases and disorders
The main pests affecting tomato plants are aphids, whitefly, red spider mites and caterpillars. Tomatoes are also prone to fungal diseases, especially blights and rots. Prompt diagnosis and action is essential.
Other actions to reduce outbreaks of pests and diseases:
* Regular inspection
* Prompt action
* Ensure good air circulation around plants
* Do not water in the evening
* Control weeds – many harbour pests and diseases
* Keep soil well mulched
* Use companion plants
* Regular feedling with foliar sprays, especially compost tea
* Water regularly and evenly – cracking of fruit, blossom end rot, wilting and dried patches on leaves all resemble disease!
